Sử dụng Spring Security trong Spring
Giới thiệu nội dung bài viết
Chào bạn, bạn đang gặp rắc rối với Spring Security? bạn không hiểu luồng đi của ứng dụng ? bạn đang quan tâm trong thực tế mình sẽ áp dụng như thế nào ? Hôm nay anh sẽ hướng dẫn mọi người cách sử dụng Spring security.
1. Demo mục đích bài hướng dẫn hôm nay
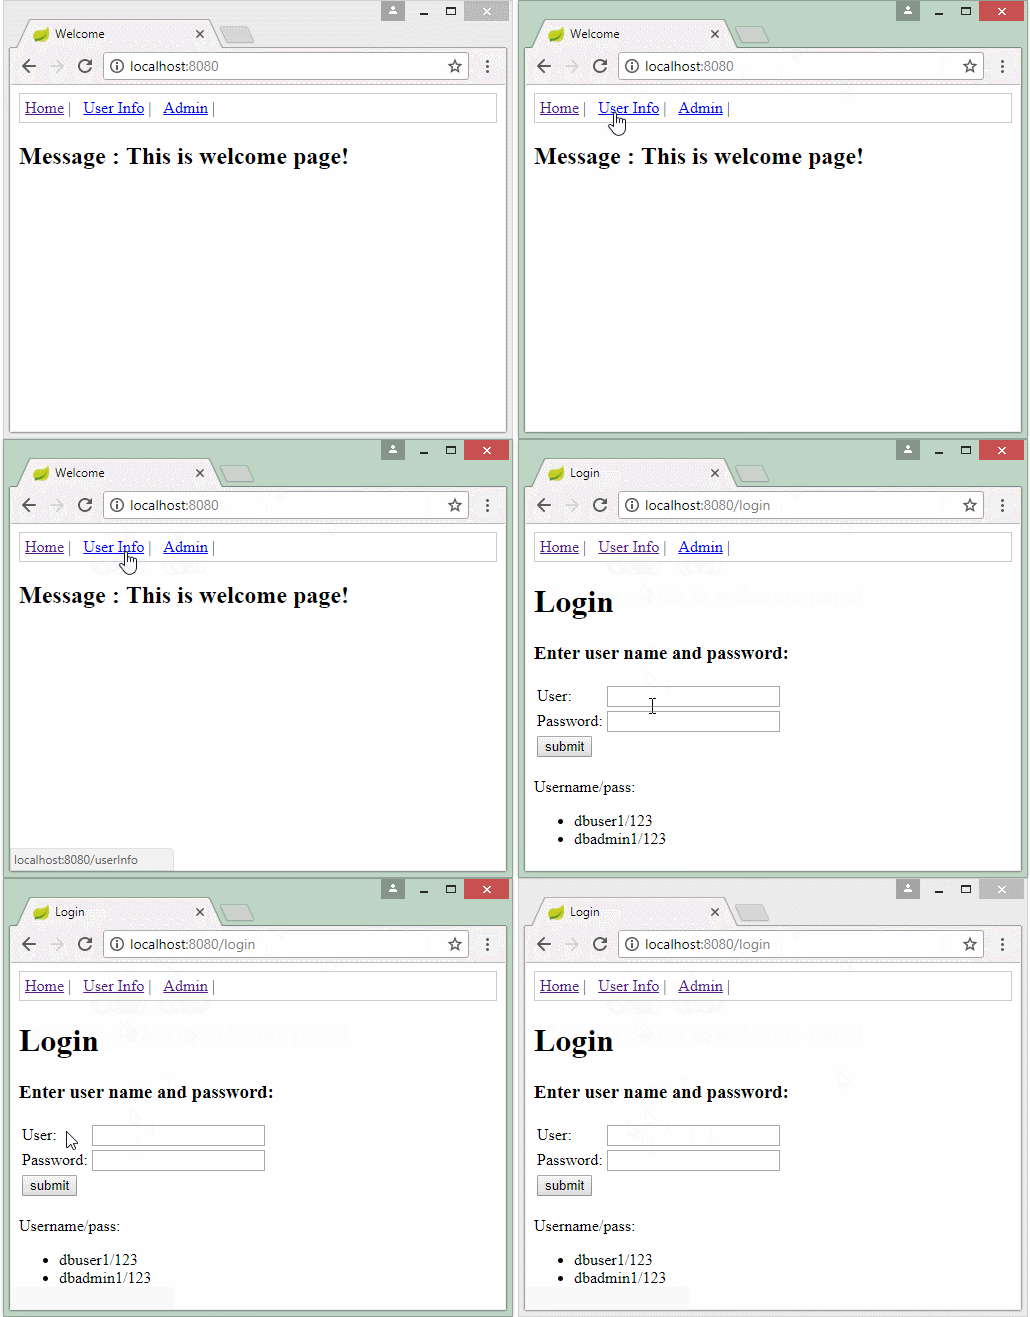
Kết thúc bài giảng hôm nay các em sẽ làm được ứng dụng phân quyền tùy thuộc vào user đăng nhập vào hệ thống là user hay admin mà ta cho phép họ vào trang web tương ứng. Ví dụ.
- Trang Home thì ai vào cũng được .
- Trang Admin thì chỉ có admin được vào và thấy được trang . Nếu là role user và vào trang Admin thì mình hiện thông báo lỗi bạn không có quyền.
- Trang User Info thì user và admin được phép vào. Cái này do mình hoàn toàn có thể thay đổi quyền trong database để phân quyền ai được phép vào trang nào.

2. Các khái niệm về Spring Security
-
Authentication : Khi nói về authentication là ta nói về chức năng đăng nhập vào hệ thống. Authentication nghĩa là bạn có phải là người dùng của hệ thống hay không.
-
Authorization : Khi nói về authorization ta nói về quyền hạn được phép làm gì? Trong ví dụ trên mình có user và admin. Bước đầu tiên họ phải authentication. Xác thực mình là user trong hệ thống. Tiếp đến tuỳ vào role của mình là admin hay user mà mình chỉ có quyền truy cập một số trang nhất định thuộc thẩm quyền của mình.
3. Hướng dẫn xây dựng ứng dụng Spring Security
Luồng đi của ứng dụng mình như sau.
-
User nhập vào username và password sau đó bấm login .
-
Server sẽ nhận được request từ người dùng và chuyển tới controller tương ứng do ta cấu hình trong file configure của spring security .
- Controller sẽ gọi Service và Service sẽ gọi database để lấy thông tin authentication đúng không và role người dùng là gì?.
- Sau khi có thông tin đúng thì trả kết quả lại cho người dùng.
Bước 1 . Chuẩn bị database để lưu thông tin user và quyền
Mình dùng database để lưu thông tin người dùng và role (vai trò,được phép làm gì). Phục vụ cho việc truy vấn username và role có hợp lệ hay không .

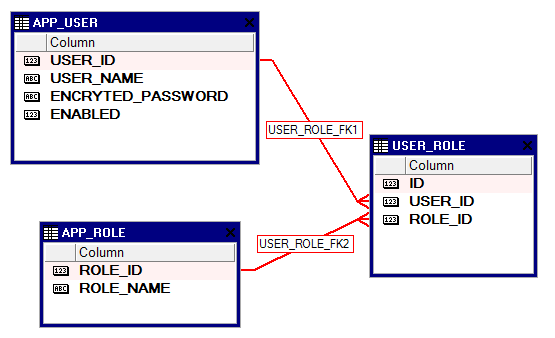
Như vậy để làm ứng dụng spring security mình sẽ lưu user name và quyền vào trong database. Anh sẽ giải thích ý nghĩa của từng bảng.
-
Table APP_USER dùng để lưu thông tin username và password. Khi người dùng đăng nhập họ truyền user name và password vào form sau đó code của mình sẽ query trong database xem là username và password có đúng như trong database không ?d Bước này chính là authentication.
-
Table APP_ROLE dùng để xác định xem user sau khi login thành công thì được phép vào những trang nào . Ví dụ admin vào được 2 trang user và admin page . Nhưng user chỉ được phép vào 1 trang là user page.
-
Table USER_ROLE là table dùng để nối 2 bảng APP_USER và APP_ROLE, nó được dùng để cho phép 1 user có thể có nhiều quyền. Ví dụ như admin có thể vào cả 2 trang user và admin .
-
Tạo database thôi nào. Anh có viết script tạo cấu trúc database và tạo dữ liệu user và admin tại đây. Mọi người copy về và chạy script này trong workbench để tạo dữ liệu nhé. https://github.com/codegymdanang/CGDN-SpringBoot-SpringSecurity.
Nếu chạy script xong thì mình sẽ có 2 users sau :
- username : dbuser1 - Password : 123
- username : dbadmin1 - Password : 123
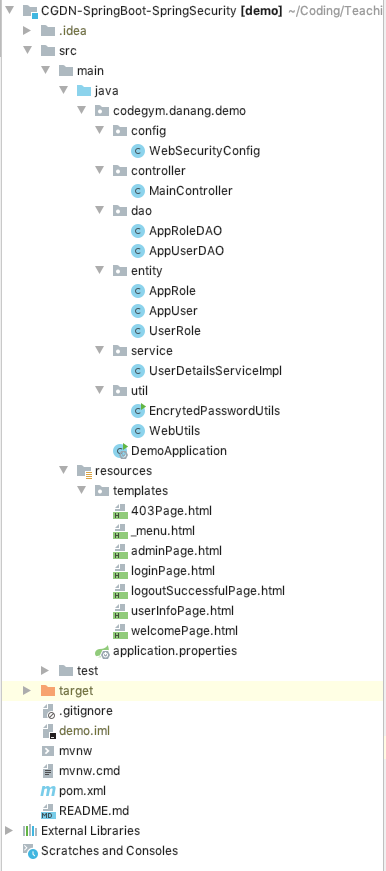
- Cấu trúc dự án

Bước 2. Thêm dependencies cần thiết trong pom.xml
Chúng ta thêm các dependencies spring security, thymeleaf, mysql connector và jpa.
1
2
3
4
5
6
7
8
9
10
11
12
13
14
15
16
17
18
19
20
21
22
23
<dependencies>
        <dependency>
            <groupId>org.springframework.boot</groupId>
            <artifactId>spring-boot-starter-security</artifactId>
        </dependency>
        <dependency>
            <groupId>org.springframework.boot</groupId>
            <artifactId>spring-boot-starter-thymeleaf</artifactId>
        </dependency>
        <dependency>
            <groupId>org.springframework.boot</groupId>
            <artifactId>spring-boot-starter-web</artifactId>
        </dependency>

        <dependency>
            <groupId>mysql</groupId>
            <artifactId>mysql-connector-java</artifactId>
            <scope>runtime</scope>
        </dependency>
        <dependency>
            <groupId>org.springframework.boot</groupId>
            <artifactId>spring-boot-starter-data-jpa</artifactId>
        </dependency>
Bước 3. Tạo form login .
Khi người dùng click vào nút submit thì action mình dùng là /j_spring_security_check cái này là mặc định của spring.
1
2
3
4
5
6
7
8
9
10
11
12
13
14
15
16
17
18
19
20
<h3>Enter user name and password:</h3>
<form name='f' th:action="@{/j_spring_security_check}" method='POST'>
    <table>
        <tr>
            <td>User:</td>
            <td><input type='text' name='username' value=''></td>
        </tr>
        <tr>
            <td>Password:</td>
            <td><input type='password' name='password' /></td>
        </tr>
        <tr>
            <td>Remember Me?</td>
            <td><input type="checkbox" name="remember-me" /></td>
        </tr>
        <tr>
            <td><input name="submit" type="submit" value="submit" /></td>
        </tr>
    </table>
</form>
Bước 4. Tạo file WebSecurityConfig để cấu hình cho Spring security .
Các bạn có thể tìm thấy file đó ở github ở trên trong thư mục configure/WebSecurityConfig. File WebSecurityConfig sẽ kế thừa WebSecurityConfigurerAdapter để mình tùy chỉnh các cấu hình security cho ứng dụng của mình. Giờ anh sẽ giải thích nhiệm vụ của các method.
- Method mà chúng ta xem xét đầu tiên là : protected void configure(HttpSecurity http) throws Exception .
1
2
3
4
5
6
7
8
9
10
11
12
13
14
15
16
17
18
19
20
21
22
23
24
25
26
27
28
29
30
31
32
33
34
35
36
37
38
39
40
41
42
43
44
45
46
@Override
    protected void configure(HttpSecurity http) throws Exception {

        http.csrf().disable(); //CSRF ( Cross Site Request Forgery) là kĩ thuật tấn công bằng cách sử dụng quyền chứng thực của người sử dụng đối với 1 website khác

        // Các trang không yêu cầu login như vậy ai cũng có thể vào được admin hay user hoặc guest có thể vào các trang
        http.authorizeRequests().antMatchers("/", "/login", "/logout").permitAll();

        // Trang /userInfo yêu cầu phải login với vai trò ROLE_USER hoặc ROLE_ADMIN.
        // Nếu chưa login, nó sẽ redirect tới trang /login.sau Mình dung hasAnyRole để cho phép ai được quyền vào
        // 2  ROLE_USER và ROLEADMIN thì ta lấy từ database ra cái mà mình chèn vô ở bước 1 (chuẩn bị database)
        http.authorizeRequests().antMatchers("/userInfo").access("hasAnyRole('ROLE_USER', 'ROLE_ADMIN')");

        // Trang chỉ dành cho ADMIN
        http.authorizeRequests().antMatchers("/admin").access("hasRole('ROLE_ADMIN')");

        // Khi người dùng đã login, với vai trò user .
        // Nhưng cố ý  truy cập vào trang admin
        // Ngoại lệ AccessDeniedException sẽ ném ra.
        // Ở đây mình tạo thêm một trang web lỗi tên 403.html (mọi người có thể tạo bất cứ tên nào kh
        http.authorizeRequests().and().exceptionHandling().accessDeniedPage("/403");

        // Cấu hình cho Login Form.
        http.authorizeRequests().and().formLogin()//
                // Submit URL của trang login
                .loginProcessingUrl("/j_spring_security_check") // Bạn còn nhớ bước 3 khi tạo form login thì action của nó là j_spring_security_check giống ở
                .loginPage("/login")//
                .defaultSuccessUrl("/userAccountInfo")//đây Khi đăng nhập thành công thì vào trang này. userAccountInfo sẽ được khai báo trong controller để hiển thị trang view tương ứng
                .failureUrl("/login?error=true")// Khi đăng nhập sai username và password thì nhập lại
                .usernameParameter("username")// tham số này nhận từ form login ở bước 3 có input  name='username'
                .passwordParameter("password")// tham số này nhận từ form login ở bước 3 có input  name='password'
                // Cấu hình cho Logout Page. Khi logout mình trả về trang
                .and().logout().logoutUrl("/logout").logoutSuccessUrl("/logoutSuccessful");

        // Cấu hình Remember Me. Ở form login bước 3, ta có 1 nút remember me. Nếu người dùng tick vào đó ta sẽ dùng cookie lưu lại trong 24h

        http.authorizeRequests().and() //
                .rememberMe().tokenRepository(this.persistentTokenRepository()) //
                .tokenValiditySeconds(1 * 24 * 60 * 60); // 24h

    }
    @Bean
    public PersistentTokenRepository persistentTokenRepository() {
        InMemoryTokenRepositoryImpl memory = new InMemoryTokenRepositoryImpl(); // Ta lưu tạm remember me trong memory (RAM). Nếu cần mình có thể lưu trong database
        return memory;
    }
- Method thứ 2 là public BCryptPasswordEncoder passwordEncoder() Method này dùng để mã hoá password của người dùng Ví dụ người dùng nhập password là abc@123 thì nó sẽ mã hoá là $2a$10$PrI5Gk9L.tSZiW9FXhTS8O8Mz9E97k2FZbFvGFFaSsiTUIl.TCrFu. Mọi người có thể đọc cách encode và thư viện encode ở file EncrytedPasswordUtils trong github .
1
2
3
4
5
 @Bean
    public BCryptPasswordEncoder passwordEncoder() {
        BCryptPasswordEncoder bCryptPasswordEncoder = new BCryptPasswordEncoder();
        return bCryptPasswordEncoder;
    }
- Method thứ 3 là configureGlobal(AuthenticationManagerBuilder auth) throws Exception Trong Spring Security có một object quan trọng đó là UserDetailsService. Đây là object của Spring, nó nắm giữ thông tin quan trọng như Username này là ai trong hệ thống , UserName này có quyền gì. Chúng ta sẽ đi chi tiết trong bước 5 tiếp theo để hiểu nó làm được .
1
2
3
4
5
6
7
8
9
10
11
 @Autowired
    private UserDetailsServiceImpl userDetailsService;


    @Autowired
    public void configureGlobal(AuthenticationManagerBuilder auth) throws Exception {

        //gọi userDetailsService trong bước 5 tiếp theo
        auth.userDetailsService(userDetailsService).passwordEncoder(passwordEncoder());

    }
Bước 5. Tạo UserDetailsServiceImpl
File này sẽ implement UserDetailsService của Spring và định nghĩa cách kiểm tra username , password và quyền của user có hợp lệ hay không Khi user login vào hệ thống ta sẽ query xuống database để kiểm tra user có đúng trong database không và quyền là gì ?
1
2
3
4
5
6
7
8
9
10
11
12
13
14
15
16
17
18
19
20
21
22
23
24
25
26
27
28
29
30
31
32
33
34
 @Override
    public UserDetails loadUserByUsername(String userName) throws UsernameNotFoundException {
        // đầu tiên mình query xuống database xem có user  đó không
        AppUser appUser = this.appUserDAO.findUserAccount(userName);

        //Nếu không tìm thấy User thì mình thông báo lỗi
        if (appUser == null) {
            System.out.println("User not found! " + userName);
            throw new UsernameNotFoundException("User " + userName + " was not found in the database");
        }


        // Khi đã có user rồi thì mình query xem user đó có những quyền gì (Admin hay User)
        // [ROLE_USER, ROLE_ADMIN,..]
        List<String> roleNames = this.appRoleDAO.getRoleNames(appUser.getUserId());

        // Dựa vào list quyền trả về mình tạo đối tượng GrantedAuthority  của spring cho quyền đó
        List<GrantedAuthority> grantList = new ArrayList<GrantedAuthority>();
        if (roleNames != null) {
            for (String role : roleNames) {
                // ROLE_USER, ROLE_ADMIN,..
                GrantedAuthority authority = new SimpleGrantedAuthority(role);
                grantList.add(authority);
            }
        }

        //Cuối cùng mình tạo đối tượng UserDetails của Spring và mình cung cấp cá thông số như tên , password và quyền
        // Đối tượng userDetails sẽ chứa đựng các thông tin cần thiết về user từ đó giúp Spring Security quản lý được phân quyền như ta đã
        // cấu hình trong bước 4 method configure
        UserDetails userDetails = (UserDetails) new User(appUser.getUserName(),
                appUser.getEncrytedPassword(), grantList);

        return userDetails;
    }
Bước 6. Tạo các điều hướng trong controller
Khi người dùng đã đang nhập thành công , họ có thể điều hướng tới các trang khác .Thì mình sẽ tạo các mapping trong Controller Để điều hướng người dùng tới các view tương ứng. Những điều hướng này nằm ở bước 4 method configure .
1
2
3
4
5
6
7
8
9
10
11
12
13
14
15
16
17
18
19
20
21
22
23
24
25
26
27
28
29
30
31
32
33
34
35
36
37
38
39
40
41
42
43
44
45
46
47
48
49
50
51
52
53
54
55
56
57
58
59
60
61
62
63
64
65
66
67
68
 @RequestMapping(value = { "/", "/welcome" }, method = RequestMethod.GET)
    public String welcomePage(Model model) {
        model.addAttribute("title", "Welcome");
        model.addAttribute("message", "This is welcome page!");
        return "welcomePage";
    }

    //Đây là trang Admin
    @RequestMapping(value = "/admin", method = RequestMethod.GET)
    public String adminPage(Model model, Principal principal) {

        User loginedUser = (User) ((Authentication) principal).getPrincipal();

        String userInfo = WebUtils.toString(loginedUser);
        model.addAttribute("userInfo", userInfo);

        return "adminPage";
    }

    @RequestMapping(value = "/login", method = RequestMethod.GET)
    public String loginPage(Model model) {

        return "loginPage";
    }

    // khi người dùng logout khỏi hệ thống
    @RequestMapping(value = "/logoutSuccessful", method = RequestMethod.GET)
    public String logoutSuccessfulPage(Model model) {
        model.addAttribute("title", "Logout");
        return "logoutSuccessfulPage";
    }

    // khi người dùng đăng nhập thành công
    @RequestMapping(value = "/userInfo", method = RequestMethod.GET)
    public String userInfo(Model model, Principal principal) {

        // Sau khi user login thanh cong se co principal
        String userName = principal.getName();

        System.out.println("User Name: " + userName);

        User loginedUser = (User) ((Authentication) principal).getPrincipal();

        String userInfo = WebUtils.toString(loginedUser);
        model.addAttribute("userInfo", userInfo);

        return "userInfoPage";
    }

    // khi người dùng là user mà thâm nhập trang admin thì mình vào đây
    @RequestMapping(value = "/403", method = RequestMethod.GET)
    public String accessDenied(Model model, Principal principal) {

        if (principal != null) {
            User loginedUser = (User) ((Authentication) principal).getPrincipal();

            String userInfo = WebUtils.toString(loginedUser);

            model.addAttribute("userInfo", userInfo);

            String message = "Hi " + principal.getName() //
                    + "<br> You do not have permission to access this page!";
            model.addAttribute("message", message);

        }

        return "403Page";
    }
Bước 7. Tạo Repository để query database
Chúng ta tạo file AppUserDAO sử dụng entity manager để tạo và thực thi câu lệnh SQL . Mình hoàn toàn có thể sử dụng JPA để query . Cái này tuỳ các em . Mục đích cuối cùng là query được User có trong table hay không mà thôi . Lớp UserDetailsServiceImpl sẽ nhúng AppUserDAO vào trong nó để thực hiện nhiệm vụ kiểm tra xem user có trong database không ?
1
2
3
4
5
6
7
8
9
10
11
12
13
14
15
16
17
18
19
20
21
22
@Repository
@Transactional
public class AppUserDAO {

    @Autowired
    private EntityManager entityManager;

    public AppUser findUserAccount(String userName) {
        try {
            String sql = "Select e from " + AppUser.class.getName() + " e " //
                    + " Where e.userName = :userName ";

            Query query = entityManager.createQuery(sql, AppUser.class);
            query.setParameter("userName", userName);

            return (AppUser) query.getSingleResult();
        } catch (NoResultException e) {
            return null;
        }
    }

}
Bước 8. Tạo các trang view cần thiết để hiện thị
Mọi người có thể lấy trực tiếp từ github của anh trong folder view.
Bước 9. Chạy ứng dụng
Như vậy là mình đã xong cấu hình cho Spring security. Phần quan trọng nhất chính là bước 4, nơi mình cấu hình và phân quyền trong Spring Security.


