Sử dụng input trong Bootstrap
Giới thiệu nội dung bài viết
Như các bạn có thể nhận thấy, hầu hết các trang website sẽ có mục để cho khách hàng nhập input vào hoặc để tìm kiếm các thông tin hoặc để nhập thông tin cá nhân như tên người dùng, password,…để truy cập hay đăng kí, đăng nhập một trang web nào đó.
Trong bài viết hôm nay anh sẽ chia sẻ về chủ đề thuộc tính Input trong lập trình web để giúp các bạn hiểu hơn về thuộc tính này. Trước hết chúng ta sẽ cùng tìm hiểu Input trong Bootstrap 4 là gì? Sau đó cùng lần lượt đi qua những hướng dẫn để thao tác với thuộc tính Input gồm textarea, checkbox, radio, select list trong Bootstrap 4. Cũng như hướng dẫn cách làm để tăng kích thước cho input trong form, và cách để tạo input group, cách kết hợp input group với checkbox hay input group với button.
Hi vọng với những chia sẻ dưới đây, các bạn sẽ nắm bắt và áp dụng được vào quá trình làm với các dự án lập trình web, và góp phần tạo ra các trang web hoàn thiện nhất cho người dùng.
1. Input trong Bootstrap 4
Bootstrap hỗ trợ các loại Input HTML5 như text, password, datetime, date, month, time, week, number, email, url, tel, và color.
Ví dụ như ta muốn input có type là text (nhập đoạn text vào input) hoặc nhập vào input là dạng password thì ta chỉ định vào trong thuộc tính type của thẻ input như sau.
1
2
3
4
5
6
7
8
  <div class="form-group">
  <label for="usr">Name:</label>
  <input type="text" class="form-control" id="usr">
</div>
<div class="form-group">
  <label for="pwd">Password:</label>
  <input type="password" class="form-control" id="pwd">
</div>
Chúng ta sử dụng .form-control để input có chiều rộng full màn hình.
2. Textarea trong Bootstrap 4
Để tạo Textarea chúng ta sử dụng thẻ textarea như sau.
1
2
3
4
<div class="form-group">
  <label for="comment">Comment:</label>
  <textarea class="form-control" rows="5" id="comment"></textarea>
</div>
3. Checkbox trong Bootstrap 4
Chúng ta sử dụng type là checkbox để tạo các checkbox.
1
2
3
4
5
6
7
8
9
10
11
12
13
14
15
 <div class="form-check">
  <label class="form-check-label">
    <input type="checkbox" class="form-check-input" value="">Option 1
  </label>
</div>
<div class="form-check">
  <label class="form-check-label">
    <input type="checkbox" class="form-check-input" value="">Option 2
  </label>
</div>
<div class="form-check">
  <label class="form-check-label">
    <input type="checkbox" class="form-check-input" value="" disabled>Option 3
  </label>
</div>
- Nếu chúng ta mong muốn các check box nằm trên cùng 1 hàng. thì chúng ta dùng class .form-check-inline.
1
2
3
4
5
6
7
8
9
10
11
12
13
14
15
 <div class="form-check-inline">
  <label class="form-check-label">
    <input type="checkbox" class="form-check-input" value="">Option 1
  </label>
</div>
<div class="form-check-inline">
  <label class="form-check-label">
    <input type="checkbox" class="form-check-input" value="">Option 2
  </label>
</div>
<div class="form-check-inline">
  <label class="form-check-label">
    <input type="checkbox" class="form-check-input" value="" disabled>Option 3
  </label>
</div>
4. Radio trong Bootstrap 4
- Chúng ta sử dụng type là radio để tạo các radio button như sau.
1
2
3
4
5
6
7
8
9
10
11
12
13
14
15
 <div class="form-check">
  <label class="form-check-label">
    <input type="radio" class="form-check-input" name="optradio">Option 1
  </label>
</div>
<div class="form-check">
  <label class="form-check-label">
    <input type="radio" class="form-check-input" name="optradio">Option 2
  </label>
</div>
<div class="form-check disabled">
  <label class="form-check-label">
    <input type="radio" class="form-check-input" name="optradio" disabled>Option 3
  </label>
</div>
- Nếu chúng ta muốn các radio button cùng nằm trên 1 dòng thì sử dụng class .form-check-inline.
1
2
3
4
5
6
7
8
9
10
11
12
13
14
15
 <div class="form-check-inline">
  <label class="form-check-label">
    <input type="radio" class="form-check-input" name="optradio">Option 1
  </label>
</div>
<div class="form-check-inline">
  <label class="form-check-label">
    <input type="radio" class="form-check-input" name="optradio">Option 2
  </label>
</div>
<div class="form-check-inline disabled">
  <label class="form-check-label">
    <input type="radio" class="form-check-input" name="optradio" disabled>Option 3
  </label>
</div>
5. Select list trong Bootstrap 4
Để tạo ra select list chúng ta dùng thẻ select và option như sau.
1
2
3
4
5
6
7
8
9
 <div class="form-group">
  <label for="sel1">Select list:</label>
  <select class="form-control" id="sel1">
    <option>1</option>
    <option>2</option>
    <option>3</option>
    <option>4</option>
  </select>
</div>
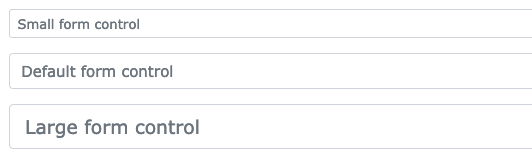
6. Tăng kích thước cho input trong form
Chúng ta có thể tạo ra những input to nhỏ và trung bình bằng cách sử dụng class form-control-sm hoặc .form-control-lg như hình bên dưới.
1
2
3
<input type="text" class="form-control form-control-sm">
<input type="text" class="form-control form-control">
<input type="text" class="form-control form-control-lg">
7. Input Group
Chúng ta có thể thêm icon text hoặc button trong input bằng cách sử dụng class .input-group-prepend hoặc .input-group-append.

1
2
3
4
5
6
7
8
9
10
11
12
13
14
15
 <form>
  <div class="input-group mb-3">
    <div class="input-group-prepend">
      <span class="input-group-text">@</span>
    </div>
    <input type="text" class="form-control" placeholder="Username">
  </div>

  <div class="input-group mb-3">
    <input type="text" class="form-control" placeholder="Your Email">
    <div class="input-group-append">
      <span class="input-group-text">@example.com</span>
    </div>
  </div>
</form>
8. Input Group và Checkbox
Chúng ta có thể kết hợp Input Group và checkbox.

1
2
3
4
5
6
7
8
9
10
11
12
13
14
15
16
17
   <div class="input-group mb-3">
  <div class="input-group-prepend">
    <div class="input-group-text">
      <input type="checkbox">
    </div>
  </div>
  <input type="text" class="form-control" placeholder="Some text">
</div>

<div class="input-group mb-3">
  <div class="input-group-prepend">
    <div class="input-group-text">
      <input type="radio">
    </div>
  </div>
  <input type="text" class="form-control" placeholder="Some text">
</div>
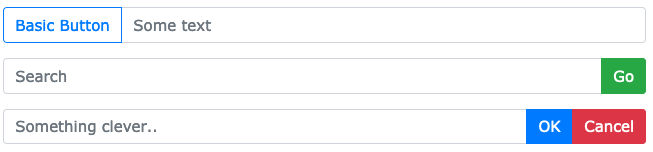
9. Input Group và Button
Chúng ta có thể kết hợp Input Group và Button.
1
2
3
4
5
6
7
8
9
10
11
12
13
14
15
16
17
18
19
20
21
 <div class="input-group mb-3">
  <div class="input-group-prepend">
    <button class="btn btn-outline-primary" type="button">Basic Button</button>
  </div>
  <input type="text" class="form-control" placeholder="Some text">
</div>

<div class="input-group mb-3">
  <input type="text" class="form-control" placeholder="Search">
  <div class="input-group-append">
    <button class="btn btn-success" type="submit">Go</button>
  </div>
</div>

<div class="input-group mb-3">
  <input type="text" class="form-control" placeholder="Something clever..">
  <div class="input-group-append">
    <button class="btn btn-primary" type="button">OK</button>
    <button class="btn btn-danger" type="button">Cancel</button>
  </div>
</div>
10. Video demo

11. Thực hành và Source code
![]()
![]()
Mọi người hãy Subscribe kênh youtube dưới đây nhé để cập nhật các video mới nhất về kỹ thuật và kỹ năng mềm
Các khoá học lập trình MIỄN PHÍ tại đây
Comments